Have you ever wondered how to fix a running toilet and why that quiet drip can swell your water bill without you noticing? We ask this question because a small leak or a constant flush can waste gallons and add up fast.
We are J Sewer & Drain Plumbing Inc., a family-owned, two-generation Chicago plumbing team, serving Chicago, IL and nearby areas since 2017. We bring calm, clear guidance and hands-on help when your toilets act up.
This short guide walks you through a safe, step-by-step process to identify whether the flapper, chain, or fill valve is the issue. Many problems are simple adjustments with basic tools; some needs a licensed plumber, and we will point those out.
We are open Monday through Saturday, 24 hrs, and we treat every homeowner like family. Follow each step, test after changes, and stop if you see leaks at connections—protecting your home is our priority.
Call (773) 231-8869 or email [email protected] to schedule and feel confident in your home.
Key Takeaways
- Quiet leaks can waste significant water and raise bills.
- We’ll guide you through simple checks of the flapper, chain, and fill valve.
- Many fixes are DIY with basic tools; know when to call a pro.
- J Sewer & Drain Plumbing Inc. is family-owned, serving Chicago since 2017.
- We’re available Mon–Sat, 24 hrs for urgent repairs and follow-up help.
Why a running toilet happens and what to check first
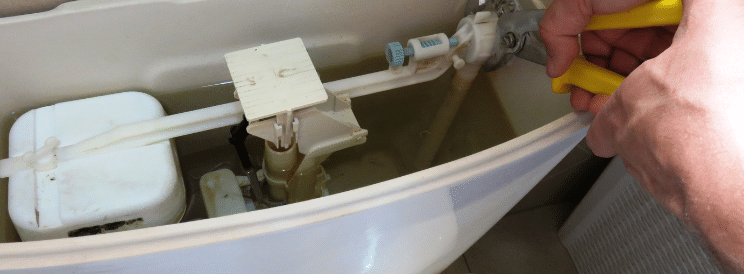
Start by watching and listening—most problems show themselves during a single flush. The handle lifts a chain that opens the flapper. Water rushes through the flush valve into the bowl, then the flapper falls back and the fill valve refills the tank until the float stops the flow.
Common signs that something is wrong
Listen for a steady hissing water flow. Watch if the tank keeps refilling or if water sits at the top of the overflow tube. These clues point you toward the flapper, fill valve, or float.
Safe first checks before touching parts
Turn off the water supply at the shutoff valve. Remove the tank lid and place it on a towel. Flush once and watch the chain, flapper, float, and fill valve as the tank empties and refills.
- Look for worn or discolored flapper rubber.
- If water spills into the overflow tube, check float and fill valve settings.
- If you see cracks, supply line leaks, or corroded valve seats, stop and call J Sewer & Drain Plumbing Inc.

How to fix a running toilet with simple DIY steps
A quick, no-tools reset can reveal if the chain is the issue. Gently jiggle the handle once the tank is full. Watch the chain for snags that hold the flapper slightly open and let water flow into the bowl.
If the jiggle fails, shut off the water at the supply valve and flush to drain the tank. Unhook the chain and lift off the flapper so you can inspect the rubber for warping, brittleness, discoloration, or mineral buildup.
Clean a dirty rubber flapper with soap and water or soak it in vinegar. Scrub the flush valve seat gently with a soft brush so the seal can sit flat. If the rubber stays stiff or misshapen, replacement is the safer repair.
- Choose a compatible flapper, install it on the overflow tube pins, and reconnect the chain with slight slack so it forms a small “J” when closed.
- Adjust chain length and handle so the flapper opens fully on flush, then closes flat with no catching under the flapper.
- Turn water back on, let the tank fill, and set the water level about 1 inch below the top of the overflow tube. Test after each step.
If repeated adjustments do not stop the running, we’re available across Chicago and nearby areas for professional repair. Test after every change to avoid creating new leaks.
Fix fill valve, float, and water level issues that keep the tank running
When the tank keeps topping off until it spills into the overflow tube, the issue usually lies at the fill valve or float. Our steps below help you stop overfilling and set a safe water level in the water tank.
Adjust the float or fill valve screw
Set the water level about 1 inch below the top of the overflow tube. This prevents constant flow into the tube and cuts waste.
- Turn the adjustment screw or pinch the float arm and lower the level a small amount.
- Flush and watch a full refill cycle; repeat until stable.
- If you see corrosion or persistent refilling, call us for a professional check.
Clean the fill valve and re-test
Shut off the water supply, flush to drain, and remove the valve cap. Hold a cup over the opening and briefly turn water on to blast out grit. Brush, reassemble, and test the valve.
Replace the fill valve if cleaning fails
Drain the tank, disconnect the supply line, remove the lock nut, and fit the new valve per manufacturer instructions. Reconnect the line without over-tightening; set the proper level and test.
Secure the fill tube
Clip the small fill tube to the overflow tube so it sits above the water line. A tube below the level or loose can cause intermittent running.
- Safety reminder: If you find corrosion, repeated refilling, or feel unsure about the supply connection, J Sewer & Drain Plumbing Inc. is available Monday–Saturday, 24 hrs across Chicago and nearby areas for valve replacement and leak concerns.
Less common causes that still waste water
Beyond flappers and fill valves, hidden paths can send water from the tank into the bowl. These small faults can create steady water loss and raise bills without obvious splashing.
Inspect the overflow tube for cracks and hidden leaks.
Drain the tank and set the water level about one inch below the top of the overflow. Look for hairline cracks, damage near the bottom, or streaks that show water tracking down the tube.
Check the flush valve seat and sealing surface.
After fully draining the tank, examine where the flapper lands. Minor pitting or light corrosion can often be cleaned with a scouring pad. If the sealing surface is deeply pitted, the amount of water escaping may not stop without replacing the flush valve assembly.
- Some pipes keep running after new parts because a hidden crack or corroded seat lets a small leak route into the bowl.
- If the water level is correct but you still hear flow, suspect a slow leak path or a worn sealing piece.
- Inspect the tank from top to bottom and around bottom fittings for moisture; catching damage early limits repair size.
When to stop DIY: Call J Sewer & Drain Plumbing Inc. if you find cracks, severe corrosion, or repeated running after several attempts. We protect your home and stop wasteful water loss across Chicago and nearby areas.
Conclusion
A steady, quiet refill usually means a small part needs attention, not a whole replacement.
Follow this simple order: check the handle and chain, confirm the flapper seals, set the correct fill level, clean or replace the fill valve, then inspect the overflow tube and flush valve seat for cracks or corrosion.
Your goal is clear: the tank should fill once, stop quietly, and hold a steady water line. Most problems end with a small part swap and a few minutes of care.
If you see corrosion, leaks, or the issue lasts after these steps, call us for lasting service. We are family-owned, two-generation, serving Chicago, IL and nearby areas since 2017.
Call (773) 231-8869 or email [email protected]. Hours: Monday–Saturday, 24 hours Open. Offices: 3343 N Monticello Ave, 3017 N Elston Ave, Chicago, IL; 809 Ridge Rd, Wilmette, IL.
FAQ
What causes a toilet to keep running and what should I check first?
A continuous flow usually stems from parts inside the tank not sealing or stopping properly. Start by turning off the water supply at the shutoff valve, removing the tank lid, and performing a quick flush test. Look for a warped flapper, a stuck chain, water flowing into the overflow tube, or a high water level caused by the fill valve or float.
How do the flapper, chain, flush valve, fill valve, and float work together?
When you press the handle, the chain lifts the flapper off the flush valve seat, letting water rush into the bowl. The flapper should fall back and seal the valve after emptying. The fill valve refills the tank and the float stops the valve when the set level is reached. If any one part fails—worn flapper, tangled chain, faulty fill valve, or misadjusted float—the system can let water run continuously.
What are quick signs that the tank is leaking into the bowl?
Listen for a steady hissing or trickle of water, watch the tank as it refills repeatedly, or spot water running into the overflow tube. You might also notice the bowl level rising slightly or the fill valve cycling frequently without anyone using the toilet.
What should I do before attempting repairs?
Turn off the water supply at the shutoff on the wall, lift the tank lid and set it aside, and flush once to observe how parts move. Working with the supply off prevents surprises and makes it safer to inspect and replace components.
What is a simple first fix I can try myself?
Try a fast reset: jiggle the handle and watch the chain for snags or excess slack. Often that releases a stuck flapper. If the flapper looks warped or deposits have built up on its sealing surface, clean or replace it. After replacing, leave slight slack in the chain so the flapper seals fully.
How do I clean a rubber flapper and the flush valve seat?
Turn off the water, drain the tank, then use a mild abrasive pad or white vinegar to remove mineral deposits from the flapper and the flush valve seat. Rinse components, let them dry briefly, then reassemble and test. Cleaning often restores a good seal and stops leaks.
When should I replace the flapper and how do I set the chain?
Replace the flapper if it’s cracked, misshapen, hardened, or won’t seat after cleaning. Attach the new flapper to the pegs, hook the chain to the handle arm with a little slack—enough for the flapper to close flat but not so long that it gets under the flapper when closed.
How high should the water level be in the tank?
Set the water roughly one inch below the top of the overflow tube. That prevents water from spilling into the tube while ensuring a full flush. Adjust the float or fill valve screw to raise or lower the final water level as needed.
How do I adjust the float or fill valve to stop overfilling?
Modern fill valves have a screw or a clip for float adjustment. Turn the screw clockwise to lower the level or pinch and slide the clip down on older float-arm designs. After adjustment, turn the water back on and observe the level and whether the valve stops without letting water reach the overflow tube.
What if debris is clogging the fill valve?
Turn off the supply, remove the valve cap or top (per manufacturer instructions), and briefly flush the valve by turning the supply on for a second to clear debris, then off again. Reassemble and test. If cleaning doesn’t help, replace the fill valve.
How should the fill tube be positioned relative to the overflow tube?
The fill tube should be clipped so its open end is above the water line and directed into the overflow tube without submerging. That ensures the bowl refills properly and prevents siphoning or continuous flow down the overflow.
When is the fill valve replacement necessary and how is it done?
Replace the fill valve if cleaning and adjustments don’t stop cycling, or if it leaks. Shut off the supply, drain the tank, disconnect the supply line, loosen the locknut under the tank, remove the old valve, install the new one following the kit instructions, reconnect the supply, and set the correct water level.
What less common issues should I inspect if basic fixes don’t work?
Check the overflow tube for cracks or leaks that let water bypass the flapper, and inspect the flush valve seat for corrosion. A corroded seat or damaged tank fitting can require a full flush valve replacement or professional help.
When should I call J Sewer & Drain Plumbing Inc. in Chicago for help?
Contact us if the leak persists after replacement and adjustment, if you find a cracked tank or corroded flush valve seat, or if you prefer a prompt, professional repair. We’ll diagnose the issue, recommend parts, and perform safe, lasting repairs with transparency and care.